

Printed Glass vs Stone Splashbacks — Which Is Better?
Choosing between a printed glass splashback and a stone splashback is one of the bigger design decisions when planning a new kitchen. Both can create a premium finish, but they offer very different looks, levels of customisation and design possibilities.
Stone has become extremely popular for its clean, continuous appearance, particularly when matched to a stone benchtop. Printed glass, however, gives homeowners something stone simply can’t — the ability to completely personalise the space with colour, photography, artwork, marble effects or virtually any image you choose.
Printed Glass Splashbacks — Designed Around You
The biggest advantage of printed glass is design freedom. Instead of being limited to the colour and pattern of a particular stone slab, you can choose photography, artwork, abstract designs, marble effects, textures or even your own personal image.
Printed glass also creates a smooth, easy-to-clean surface with very few joins. Because the design is printed behind the glass, the image is protected from everyday kitchen cleaning and wear.
Virtually unlimited design choices
Custom-made to suit your kitchen
Easy-to-clean glass surface
Available in photographic, artwork and marble-style finishes
Creates a genuine feature piece in the kitchen
Stone Splashbacks — Seamless and Sophisticated
Stone splashbacks are popular because they can create a clean, continuous look when matched with the benchtop. Natural and engineered stone can give a kitchen a very high-end appearance, particularly in minimalist designs.
The trade-off is that you are generally limited to the colours, veining and patterns available in the stone itself. Large slabs can also add considerably to the overall kitchen budget.
Premium, seamless appearance
Can match the benchtop perfectly
Durable and easy to maintain
Limited to available stone colours and patterns
Often more expensive for large splashback areas
So Which One Is Better?
There isn’t one answer that suits every kitchen. If you want the splashback to blend seamlessly with your benchtop, stone can be an excellent choice. If you want your splashback to become a feature, add colour, showcase artwork or create something completely unique, printed glass gives you far more creative freedom.
Printed glass can also be a strong option for homeowners who love the look of marble or stone but want greater flexibility in colour, pattern and scale.
See It in Your Own Kitchen Before You Decide
Our free visualiser lets you upload a photo of your kitchen and try different images before making a decision. You can explore scenic photography, artwork, marble-style finishes or your own image and see how it could look as a printed glass splashback.
Try the free splashback visualiser or contact Port Stephens Splashbacks for a free onsite measure and quote.
How long can we go?
At Port Stephens Splashbacks, we make what we sell. We don’t outsource and we pride ourselves on continually developing the product to give the superior quality people expect from a Hunter-based business. You can be assured that the person you deal with is the same person who will be getting their hands dirty on the factory floor. We don’t project manage or outsource the work- so we maintain consistently high standards without dealing with overseas companies who farm the work out to various sub-contractors. When we say “printed glass splashbacks - that’s what you get. We don’t print onto vinyl stickers and slap them on the back of the glass. We print directly to the glass… and that’s the big difference. That’s why we can offer a 10 year guarantee against peeling, cracking, fading and delaminating- because we know how to print to glass.
Our printer handles glass sizes up to 3.2 m x 2m. To print larger sizes requires the glass be printed in two pieces - however you can be assured that the print is going to maintain its quality for life and won’t deteriorate over time. Quality is always our number one priority.
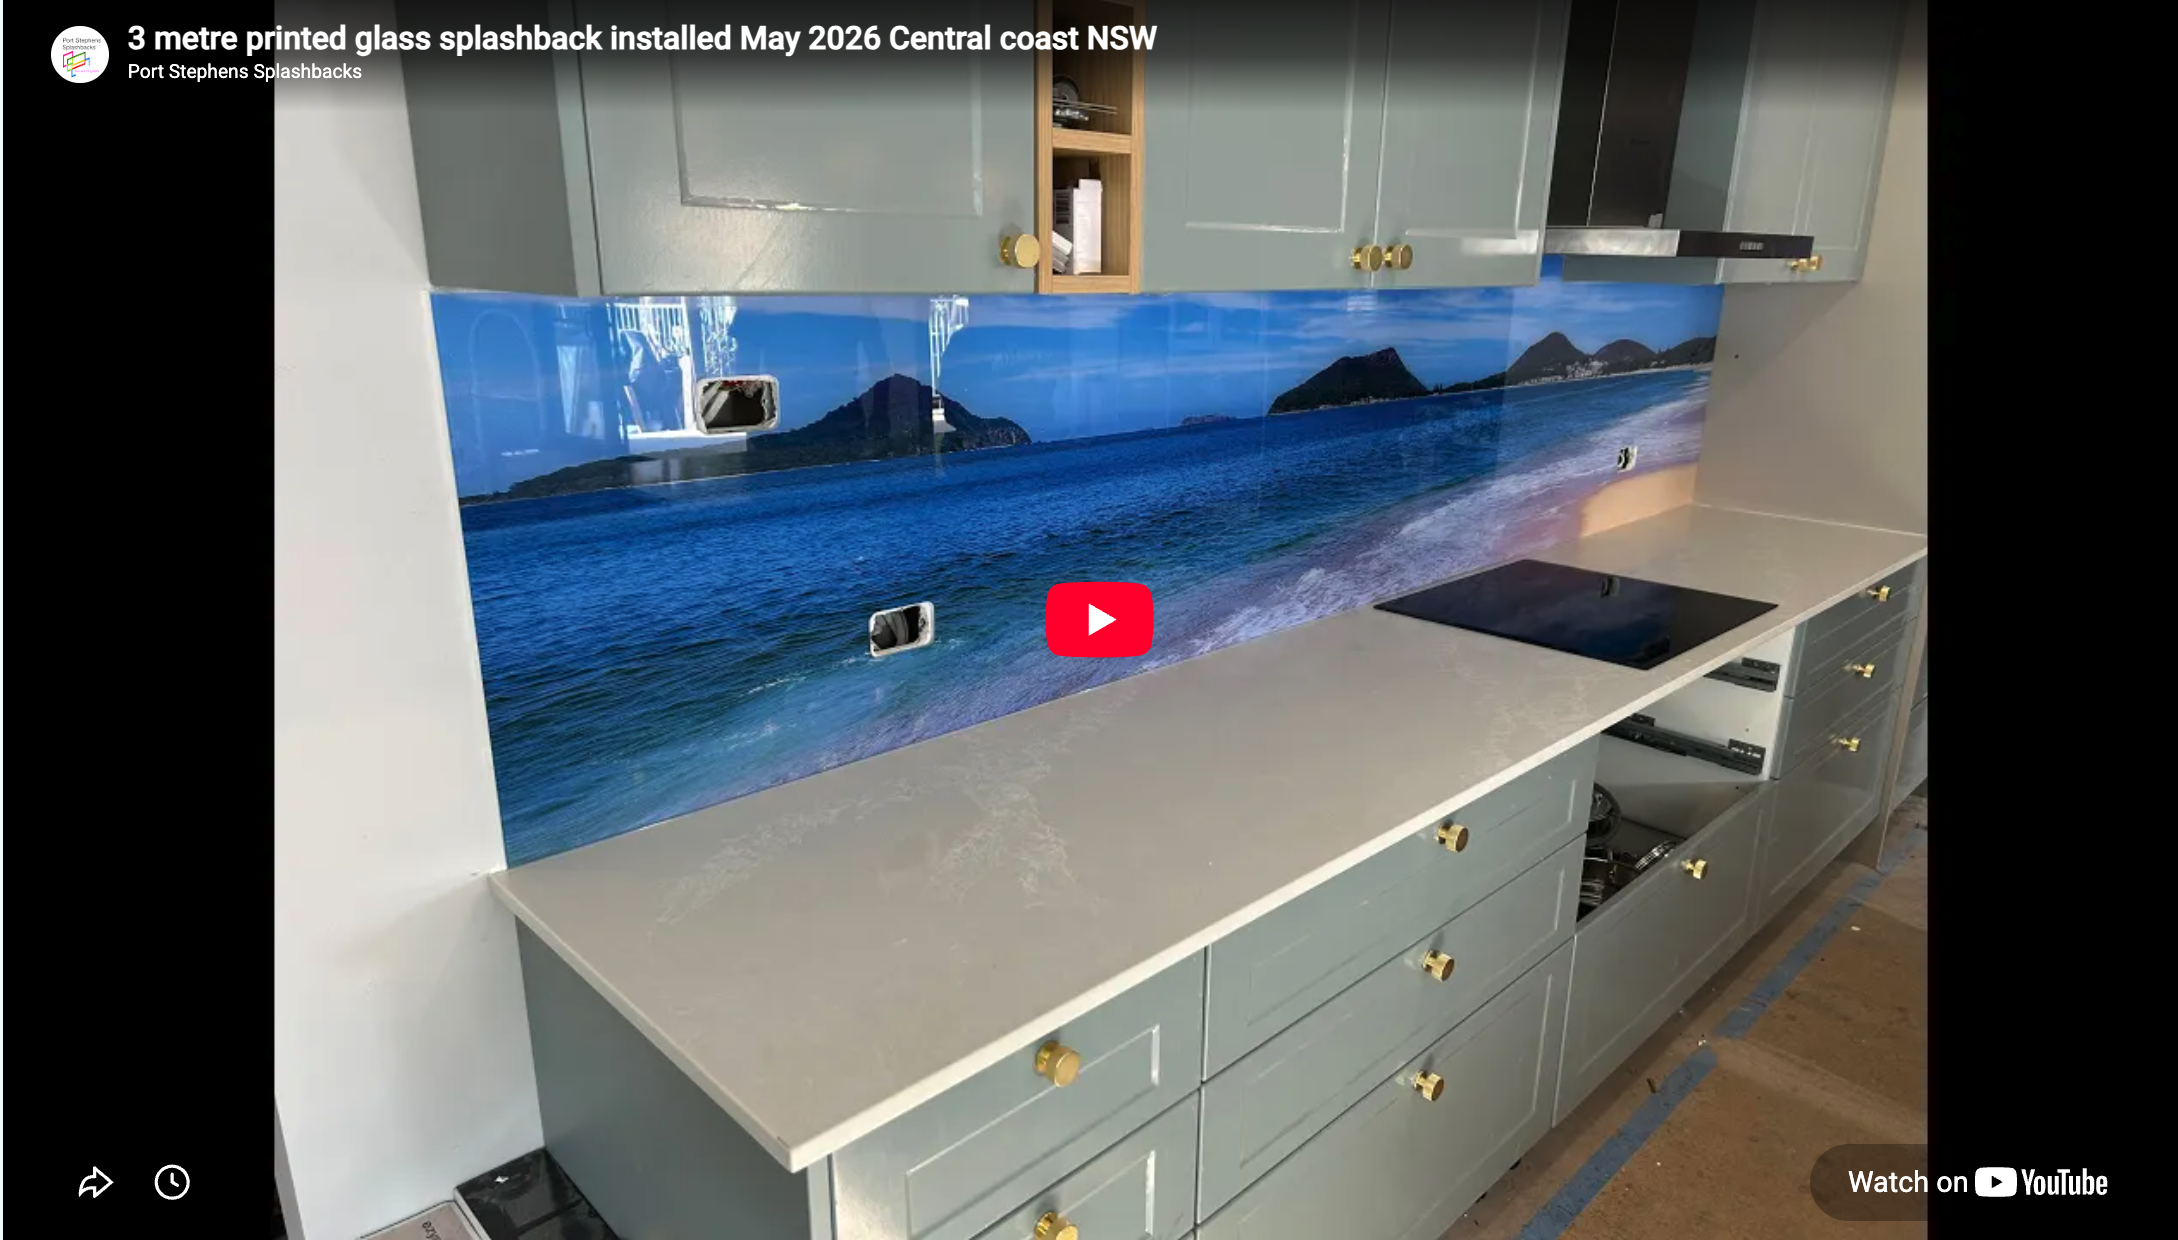
Check out this 3.2m splashback we installed in May 2026 in Wyee NSW. The powerpoints are ready to be installed and don’t you just love the effect of the waves crashing onto the benchtop? That was a pure coincidence because of the colour of the marble pattern of the benchtop - but it really does make it look and feel like a window.
removing an old splashback
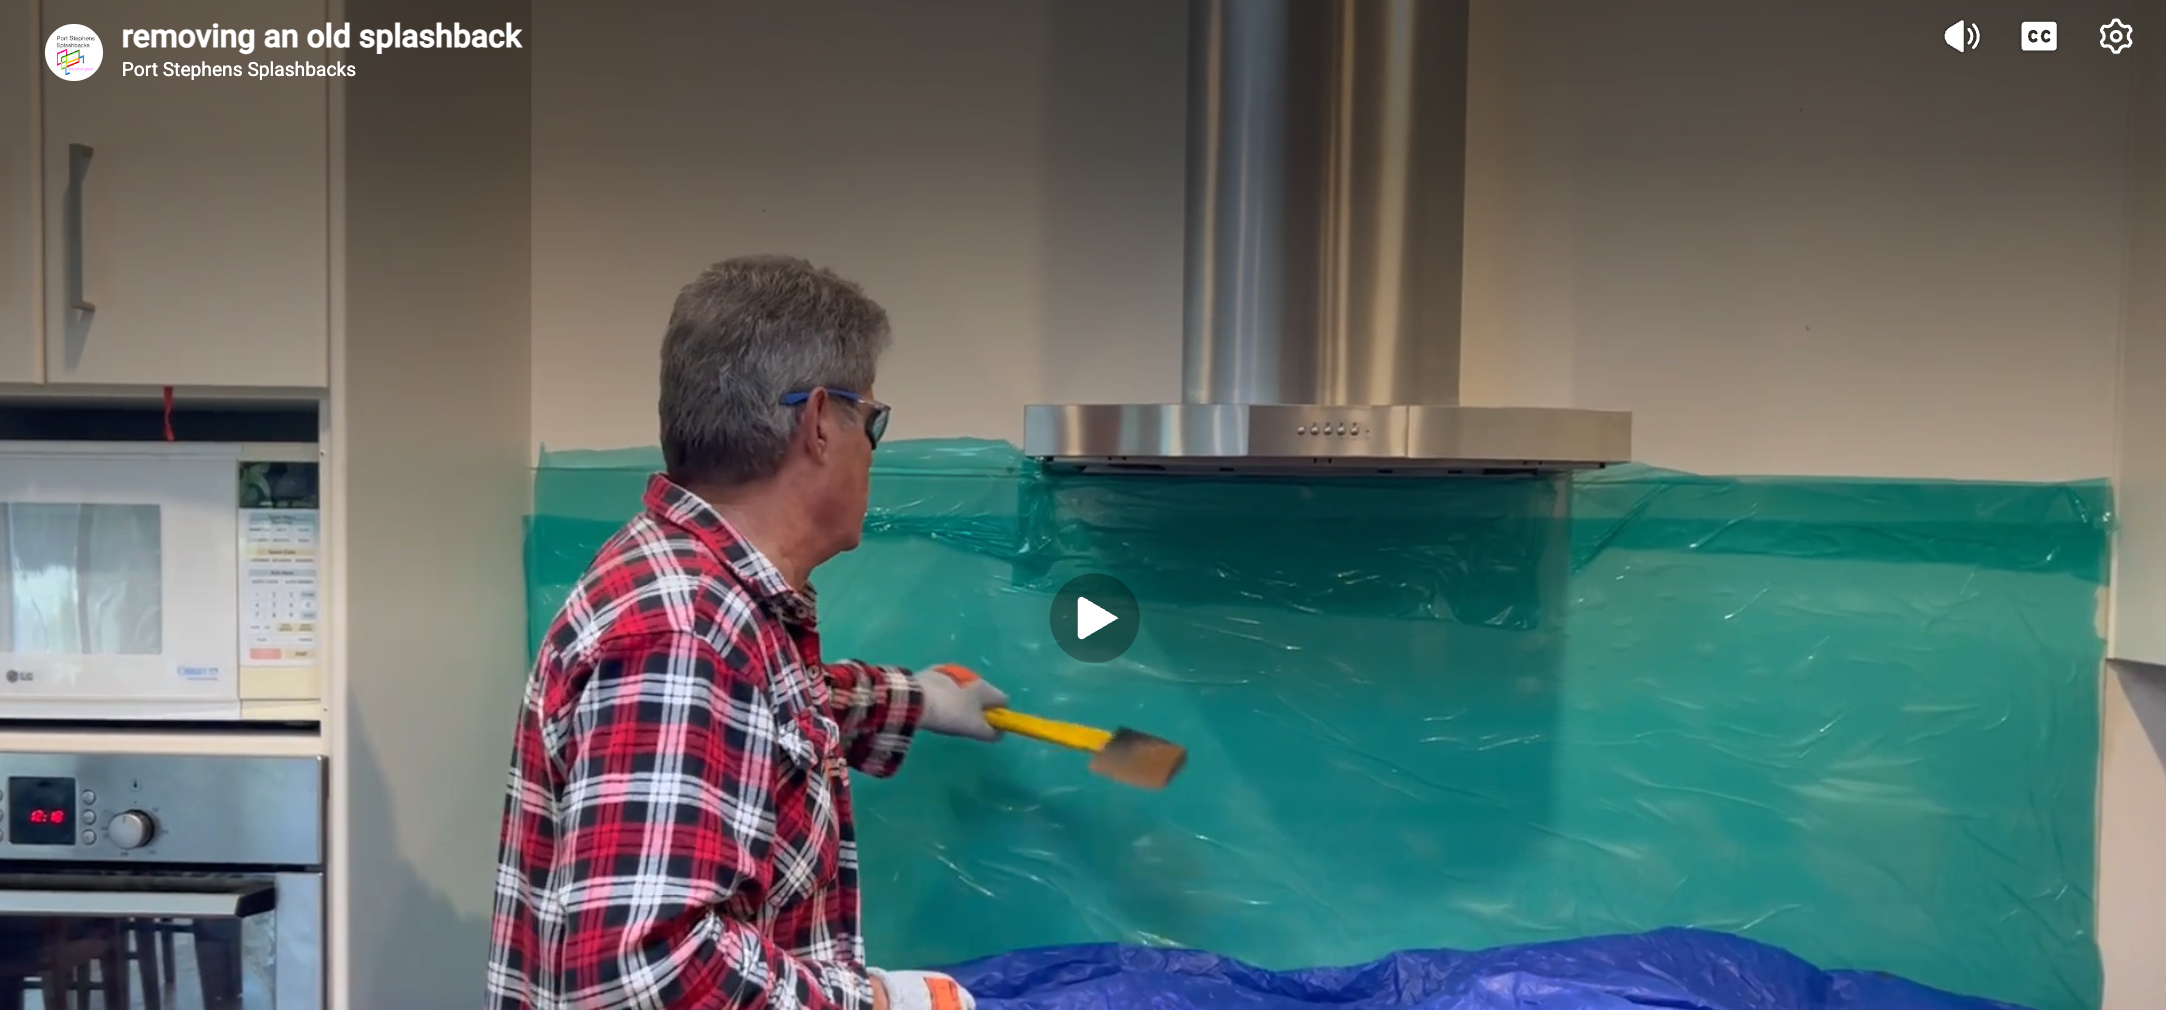
If too much silicone has been applied to a splashback, it is virtually impossible to remove using the usual leverage techniques. If that happens the only alternative is to smash it- however toughened glass is designed to be impact resistant. In that case you need to find a weak point such as a GPO cutout. If there’s no weakpoint, then you need to create one. Here’s a simple hack to break toughened glass so that it can be safely removed using a paint scraper.
We place a sheet of industrial protective film over the glass to prevent the beads of glass from flying everywhere.
The using a hammer drill, we drill a hole in the glass to create the wek point. then a simple tap - and the glass is ready to be safely scraped off.
When Removing an Old Splashback Is Necessary: Lessons from a Tough Installation
Why Sometimes You Can't Just Install Over Existing Tiles—and the Challenge of Tempered Glass.
In most kitchen renovations, installing a new splashback is a straightforward process. Typically, you don’t need to remove the old splashback or tiles; the new one can be fitted right over the existing surface, saving time, money, and a fair bit of mess. That’s especially true if you’re working with glass splashbacks, which can often be glued directly onto the previous layer with minimal fuss.
However, every so often, a unique situation crops up that forces you to take a different approach. In a recent installation, we encountered exactly that—a scenario where removing the old splashback was unavoidable. The reason? The client wanted to upgrade to a 6mm thick glass splashback behind the cooktop, but there simply wasn’t enough space to add that thickness on top of the existing tiles. Sometimes the dimensions of the kitchen or placement of appliances leave you no choice but to strip everything back to the wall.
Complexities of Splashback Removal
Removing an old splashback isn’t always as simple as it sounds, especially when you’re dealing with tricky materials and stubborn adhesives. In this case, the walls behind the splashback were solid concrete—already a tough canvas to work with. On top of that, the previous installer had used an excessive amount of silicone to fix the glass in place. Silicone is fantastic for waterproofing and flexibility, but it can be a nightmare when you need to pry something loose. There was no gentle way to get the splashback off; smashing was the only option.
How Tough Is Tempered Glass?
This installation provided a great example of just how strong tempered glass can be. Tempered glass is designed to withstand knocks, heat, and everyday abuse in the kitchen, so it’s not surprising that after several hours of hammering, the glass refused to break. It was both frustrating and impressive—just goes to show the quality you’re getting with a glass splashback!
Eventually, I found a weak spot and, with the help of a crowbar and a heavy hit, managed to break through. If you ever need to do something similar, make sure you’re prepared for a workout and have the right tools on hand. It’s certainly not a job for the faint-hearted.
Safety First
Whenever you’re dealing with glass, especially when breaking it, safety is paramount. In this case, I used a vinyl sticker to cover the glass before attempting to smash it. This simple precaution helped prevent shards from flying everywhere, making the clean-up much easier and reducing the risk of injury. Of course, safety goggles were a must as well—protecting your eyes from stray fragments is non-negotiable.
Final Thoughts
While most splashback upgrades can be done without removing the old one, there are exceptions. If space is tight or there are structural concerns, removal might be the only way forward. When faced with tough materials like tempered glass and stubborn silicone, patience, the right equipment, and a focus on safety will get you through. And if you ever doubt the durability of your glass splashback, just remember—it might take hours of hammering before it finally gives in!